Аnthro Tea Towel and Napkin Pillows

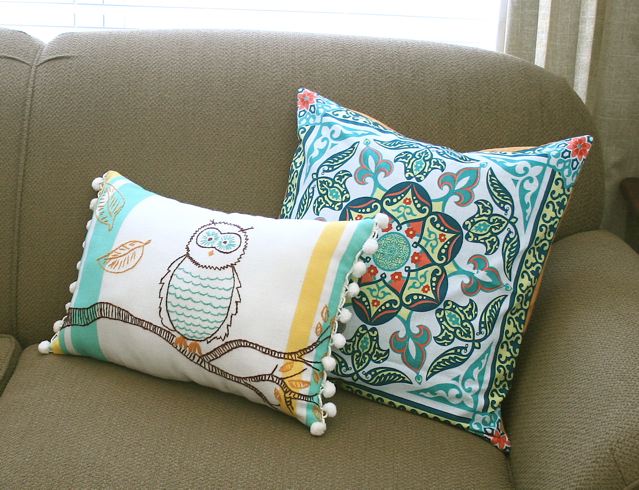
Tea towel pillow on the left, napkin pillow on the right.
In the tradition of the Anthro placemat pillows, here are two more methods to create home decor from table linens. This is a much more affordable option for me than actually buying the pillows. I drool buckets over most everything in Anthropologie’s home decor section but can’t get past the price tag, even with the devil on my shoulder.
I really have to give credit for this way of thinking to my bosom friend Robyn, who was the one who showed me years ago how to repurpose placemats into pillows and to use tablecloths for shower curtains and stuff like that. She opened a whole new world for me. I’ve even used place mats to make a really non-cheesy looking (promise) window valance.
Incidentally, once you are addicted to this method, another great place to get beautiful table linens on sale is here. I had placemat pillows from C&B on my couch for a few years before I made these latest.
Now, on to the particulars, if you’d like to make some pillows like these.


For the napkin pillow you need:
- a gorgeous square fabric napkin that you scored on sale, 20 x 20 inches. Okay the sale is not strictly necessary, but it is more satisfying.
- coordinating fabric for the back, two rectangles that are 20 x 16-ish inches
- an existing 18 x 18 inch pillow (don’t worry — this is a removable cover, so you don’t have to sacrifice the existing pillow)

Step one: Along ONE long side of both pieces of backing fabric, sew a narrow hem. If you are not familiar with a narrow hem, you just press over 1/2 inch of fabric toward the wrong side along the edge, then fold under half of that again and edgestitch it. I don’t bother pressing the second fold, I just fold it under with my finger as I’m sewing it down.

Step two: Lay your napkin down right side up, and align your backing pieces on top of it, right sides down, with the raw edges at the edge of the napkin, and the narrow hems running across and overlapping in the middle of the napkin (your backing pieces overlap to create a slit to stuff your pillow in or take it out again). Pin everything securely. I pinned along the edges of my slit as well, to keep things in place as I sewed.

Step three: Sew all the way around the edge of the square, being sure to backstitch to secure your stitches. It was preferable for me to sew along the inside of the hem that already existed on the napkin so I could save the pretty design in the corners of the napkin. That gave me about a 1/2 seam allowance all around, which yields a cover that is about 19 inches square — a slightly relaxed fit for an 18″ pillow, and no need to trim the excess seam allowance.
If you prefer a snug fit for your cover, sew a scant 1 inch hem all around instead. If you do this method, I recommend you also trim the excess seam allowance and finish the raw edges with overlocking stitches or pinking shears.

Step four: Turn it right side out through the slit and press it. Now stuff it with your existing pillow and admire your pillow makeover prowess.
This method is of course adaptable depending on the size of your napkin and the size of your existing pillow, as long as your napkin is slightly larger than your pillow. If it isn’t, you could get really creative and piece some fabric strips around your napkin to make it the right size, now couldn’t you? Yes, you could!


For the tea towel pillow you need:
- a pretty embroidered tea towel that you couldn’t resist, and that NO one in their right mind would use to wipe up anything.
- floofy ball trim for two sides, optional
- bag of polyfil stuffing

Step one: Fold your tea towel in half, aligning the short sides. Cut it in half.

Step two: If you are using ball trim, glue or baste stitch it along the short edges of the right side of one piece, balls turned inward. I used fabric glue.

Step three: Pin the two pieces right sides together, making sure your little poofballs are out of the seam. Beginning in the middle of the bottom long side, sew a quarter inch hem all the way around, leaving about four inches unsewn on the bottom edge for stuffing. Turn it right side out and press.


Step five: Stuff that baby full of polyfil. Use small handfuls of stuffing and make sure you stuff the corners first, then the middle. When the desired firmness is reached, pin the opening closed with the quarter inch hem folded inside and hand sew it together with a whipstitch in coordinating thread. You are done, Pillow Master.


I'm loving the owl.
Those are so pretty, Larissa!
I have the same napkin, scored in the same sale, picked up with the same purpose in mind! Seeing how cute it looks finished just might be the impetus needed to get me to actually make mine into a pillow.
They look so neat!
Genius! I love that owl and the bobble trim is perfect. Thanks for the tutorial.
Larissa – I have just found your blog and fallen in love with it!! Your tutorials are so clear – I think I may actually be able to make something for my ever nagging daughters!
Thank you so much for your time & talent!
Fleur
xx
Your talent is inspirational to me! Love your work
Such a great idea…thanks for sharing!
I don't know what I love more…the pillows or your sketches!!!
This is a great idea! I'll remember it next time I visit Anthropologie or another high-end home store!
I can just imagine them sitting on your couch in your oh so welcoming living space. such a neat idea with the tea towel!
Everybody, thanks for your kind comments. I'm really loving the new pillows. I hate that I put off sewing them for so long. I could have been enjoying them since mid-April. sigh.
marble rose (fleur), welcome! Thanks for joining us. I hear ya about the demanding daughters. However, once you make them something, I'm afraid it only feeds the frenzy. 🙂
Jessica, we miss you! wish you were sitting on the couch with the pillows for a visit.
Stumbled upon your blog a couple months ago and am so thrilled about this tutorial! I'm not very savvy at sewing but this is so so helpful. Thank you for sharing it!
Too adorable, I want!
I found your blog a couple of months ago and love it! I'm new to sewing and your projects are great. I, too, just borrowed "Ballykissangel" – series 3 – and COULD NOT BELIEVE they killed off Assumpta!! What were they thinking?? Glad I'm not the only shocked one.
you're very clever! they turn out so pretty!!
wonderful idea!
everyone, thanks for the love! and I'd be thrilled to see any pillows you make from the tute.
momma — I KNOW, RIGHT? WHAT IN THE WORLD?????? I kept waiting for her to miraculously rise. I was thinking, "they cannot possibly have done what I think they just did." Argh!
What a great idea! I love anthropologie too!
Lovely idea!
1. I love the pillows, makes me feel the need to make a trip to my nearest Anthropologie.
2. Some how missed the fact that Crate&Barrel had an online outlet! Very exciting.
3. "Bosom" friend reminded me of Anne of Green Gables. I borrowed the first one from the library, loved that movie as a child. Fan?
Katie, yes, that is a direct reference to Anne with an E. I love that series. Glad I could turn you on to the C&B outlet goodness.
I have just bought a load of tea towels and hand towel but they are bamboo towels, all natural fibers and they are the softest material i have ever felt. I was joking with my husband about making pillows out of them and now i can give it a go! Thanks.
adorable! thanks for sharing the tutorial. now off to check out the rest of your blog 🙂
nerissa
These pillows are so cute! I love anything with a bird on it right now for some reason. With that said, I adore the owl pillow — Wish I were crafty enough to make one!
cute owl…I love the pom poms!
I found your blog via a google search on how to make pillows out of napkins… THANK YOU for the awesome instructions!!
I have a friend who just decorated her nursery with these exact same colors and an owl theme! As soon as I saw this I ran to my friendly neighborhood Anthro and snagged that sucker. So excited–thanks for the great idea!
Oh, thank you for the tutorial. I have this and other owl towels from Anthro and would love to do this. I was going to make kitchen curtains, but this is much better!
Love them. LOVE. I've got a couple place mat pillows (World Market) rocking with their bad selves on my couches right now. 🙂
I made a tank top out of one of those napkins back in my early days of sewing, about the same time these were in the store! http://www.laricci-smunch.blogspot.com/2009/06/wipe-your-mouth-please.html
Is the owl also from Anthro?
Heather, yes it is!
Love your tutorial and your sense of humor. 🙂 I'm teaching myself to sew again after 30+ years. Thanks for the clear instructions.