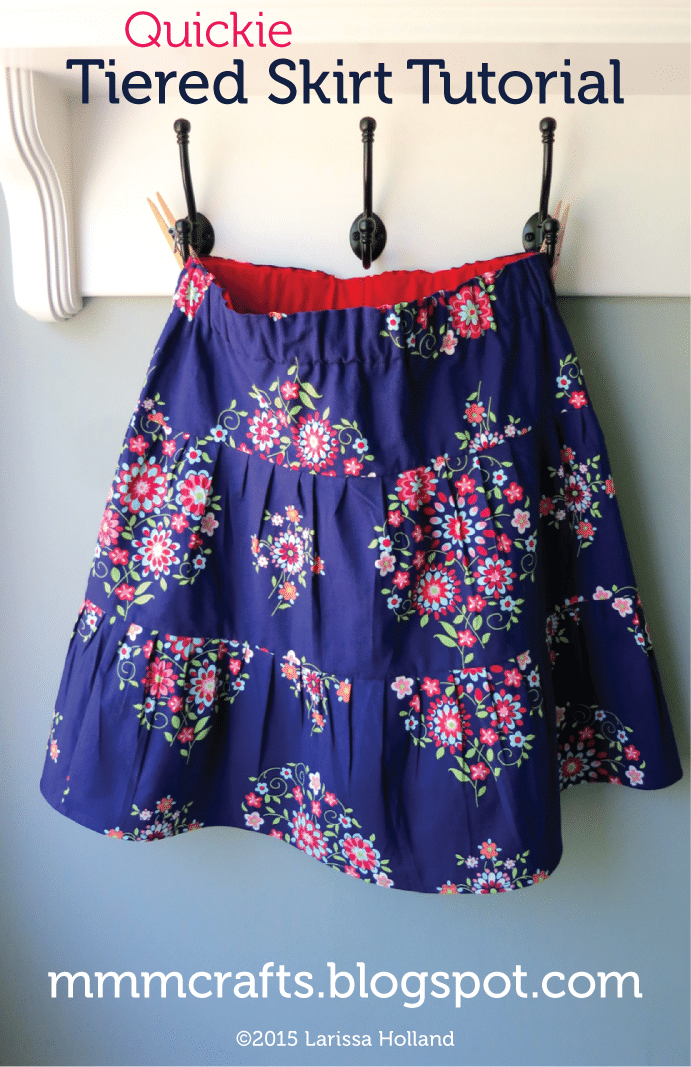
Quick Tiered Skirt Tutorial for Preteens

You’ll need:
A girl that is 10-13 yrs old and sized more or less like my kids. haha. My two girls are 21 months apart but right now they wear the same size of clothes. They are both taller than average and usually wear a 12/14 in girls clothing (and sometimes a 16). I made the gray Washi skirt slightly longer than the navy original since they are both growing at an astonishing rate right now.
This is an elastic waist skirt, so it’s pretty forgiving and there’s room to adjust the waist a few inches either way.
If your kid is a much bigger or smaller than mine you may need to adjust widths and lengths before you begin.
Pondering? Measure your kid’s:
1) waist (wherever they wear their skirts)
2) length from their waist to their knee.
This will give you an idea if this skirt will work for your kid as is.
Or if you are a petite mom, this skirt may work really well for you!
Finished size:
This skirt is about 21 inches long from waist to hem. The waist on ours is about 30 inches around and is meant to be worn low, just below the belly button (you can adjust the waist size below and of course you can adjust the hem).
That’s how both my girls wear everything, slung low.
Materials:
- About 1.5 yards of medium weight cotton or chambray.
- A package of 1 7/8 inch wide bias hem facing. Mine is Wright’s brand. This makes for a really easy channel for the elastic and adds a nice contrast of color inside the waist. (If you don’t want to buy hem tape you can use a wide grosgrain ribbon.
- A length of 1.5 inch wide elastic for the waistband that is long enough for your kid. In my case, that was 30 inches.
- A ruffler for your machine.
Rip the fabric pieces:
Don’t be afraid to rip! It’s so much faster than cutting and you can count on it being on the grain and straight. And it’s OK if your yardage is wrinkly. Rip first and press later! See, I’m already saving you gobs of time.
First true up the top edge. Cut a 1 inch slit in the selvedge side close to the top of the fabric. Snip it straight across the selvedge and then use your hands to continue ripping the fabric all the way across. I pause at the end (which is the opposite selvedge) and then I snip the that last little bit with scissors to keep from tugging it too hard. Discard what you ripped off.
Now you have a straight top edge to measure the rest from.
Rip the following pieces for the skirt by measuring along the selvedge and clipping a slit through it, same as you did above. Measure one, clip, rip. Then measure the next one.
Press all the ripped pieces and whack off the selvedge edges. (Which has the added advantage of squaring up the ends. They can look a bit wonky from the ripping.)
FOR ALL THE SEWING: Use 1/2 inch seam allowances.
RST = Right Sides Together
Make the waistband.
1) Shorten the ripped 7 inch waistband piece to your kid’s waist measurement plus about 8 inches. Mine was 38 inches total. Cut a piece of hem tape to the same length.
2) Sew the short ends of the waistband fabric RST (right sides together) to form a loop. Finish and press the seam.
3) Press 1/2 inch toward the wrong side along the top edge.
4) Press under 3/8 inch of the bias hem tape on both ends. Starting to the right of the waistband seam, pin it all the way around about 1/16 inch down from the top edge. The ends should meet and overlap just a tad. Edgestitch the hem tape in place on top and bottom. When you finish you’ll have a slit for the elastic where the hem tape meets. Tada.
Make the tiers.
5) Did you already cut one of your 8 inch pieces in half? Good. Throw one of the halves in your scrap pile. Sew the other one RST to the full length 8 inch piece on the short side. Finish and press the seam.
6) Sew the two 10 inch pieces RST on the short side. Finish and press the seam.
7) Break out the ruffler. Set it to one tuck every 12 stitches. Stitch length should be 2 or 2.5. If your child’s waist measurement is larger than my kid’s, go with 2.5.
8) Ruffle both the tiers along the top edge with a slightly less than 1/2 inch allowance. Clackety clackety clack. ALERT: Be sure to check that your needle is screwed in tight every few tucks. The ruffler might be busy trying to loosen your needle as it goes along. It’s a bummer when you have to stop and screw the needle back in while your ruffler tries to look all innocent.
9) Press the ruffles nice and flat.
10) Now sew the two tiers together RST. The ruffled edge of the longer tier goes face to face with the UNRUFFLED edge of the shorter tier. Those sides should be somewhere near the same length, give or take a few inches. Pin them starting at the midpoints. Sew the seam. Finish and press the seam.
11) Now trim the sides flush. Just follow the line of the shortest tier on both sides.
12) Lay the waistband loop flat on a table. Fold the skirt tiers in half, wrong side out, and line them up to the bottom of the waistband as straight as you can. Measure how much you need to cut off of the skirt in order for it to match up to the waistband but don’t forget to keep an extra half inch for the seam. If you need to, err a bit on the large side. You can always ease it in. Trim it!
13) Pin that seam together and sew RST. Finish and press the seam.
14) Pin and sew the tiers RST to the waistband. To do this, turn the waistband right side out and upside down. Turn the skirt wrong side out and tuck the waistband down inside the top, lining up the raw edges. I like to put the vertical waistband seam in the center back and line up the skirt seam on the side.
15) Pin the front, back and sides, evenly distributing the fabric. Finish pinning well and sew. Finish and press the seam.
16) Feed the elastic through the waistband with a bodkin or a hugemongous safety pin. Overlap the ends of the elastic by about an inch and secure it with a (normal sized) safety pin. Don’t bother tucking the ends inside yet.
17) Now’s the time to check the fit on your kid and also the length. Call them imperiously to you and tell them to drop their shorts. Haha. If they complain about trying it on, make them stand there longer than is strictly necessary while you pretend to dither about the length of the hem.*
*Parenting styles may vary.
18) If the fitting was great, sew as is. If you need to adjust the waist elastic, do that now.
19) Sew the overlapped ends of the elastic together. Pull it inside the waistband by stretching out the waistband. Pop! It disappears inside.
20) Zig zag stitch over the hem tape slit to close.
21) Hem the skirt 1 inch with a double fold 1/2 inch hem. (Or a different amount depending on your kid.) To do that, press 1 inch over to the wrong side, then fold it under itself and press. Edgestitch and you are done! Yay!
I hope you enjoyed this tutorial! I made these two skirts in two afternoons, kind of working on them here and there.
My girls love these skirts. And each other. Deep, deep inside.
I need to make them one in plain chambray because that is such a versatile fabric. I might even take a crack at making myself one. No reason you can’t make an adult-sized tiered skirt for yourself. Just make adjustments for your waist size and skirt length and use the same process. You’ll probably need to use a longer stitch length for the ruffler. Love to see what you make!


Very cute skirts! I can't wait to try it for my pre-teen. Where did you get that fabric?
Hey, Happy Carrot, thanks! Both fabrics are oldies from my stash. The floral is an Amy Butler I think and the washi tape pattern is by Rashida Coleman Hale. I probably got them from Fabric.com.
Amy Butler one is called Love Memento.
Thanks!
Thanks for the really cute and simple pattern. I have a love/hate relationship going with sewing. I had 5 boys and only 1 girl, but after about the age of 3, she refused to wear dresses. You can imagine how frustrated I was because after all those boys, I wanted to dress up a girly girl!! All she wanted was jeans and tee's. 🙁 Now I have granddaughters to sew for and can girly all I want. Because it took me so long to be able to sew, it's like starting all over again. But it's coming along. I am also quilting so am getting lots of practice sewing. 🙂
Hi, Judy! Thanks! My long-suffering mom got to clothe FIVE girls and we all liked dresses. She might've been glad to see more tees and jeans. I hope you enjoy making the skirts! Happy sewing.