
Tips and Tools for Making My Heirloom Ornaments

I’ve listed a few of my go-to crafting tools below. They are game changers! (Are you new to this type of crafting? Get started here.) Need more tips? Check here!
1) THE WONDER THAT IS SULKY® STICK ‘N STITCH (aka Sticky Fabri-Solvy)
Can’t say enough about this magical felt craft and embroidery helper.

This adhesive stabilizer is the key to making my heirloom ornaments and Christmas decor. I live in terror of it being discontinued. I miiiiight be hoarding it.
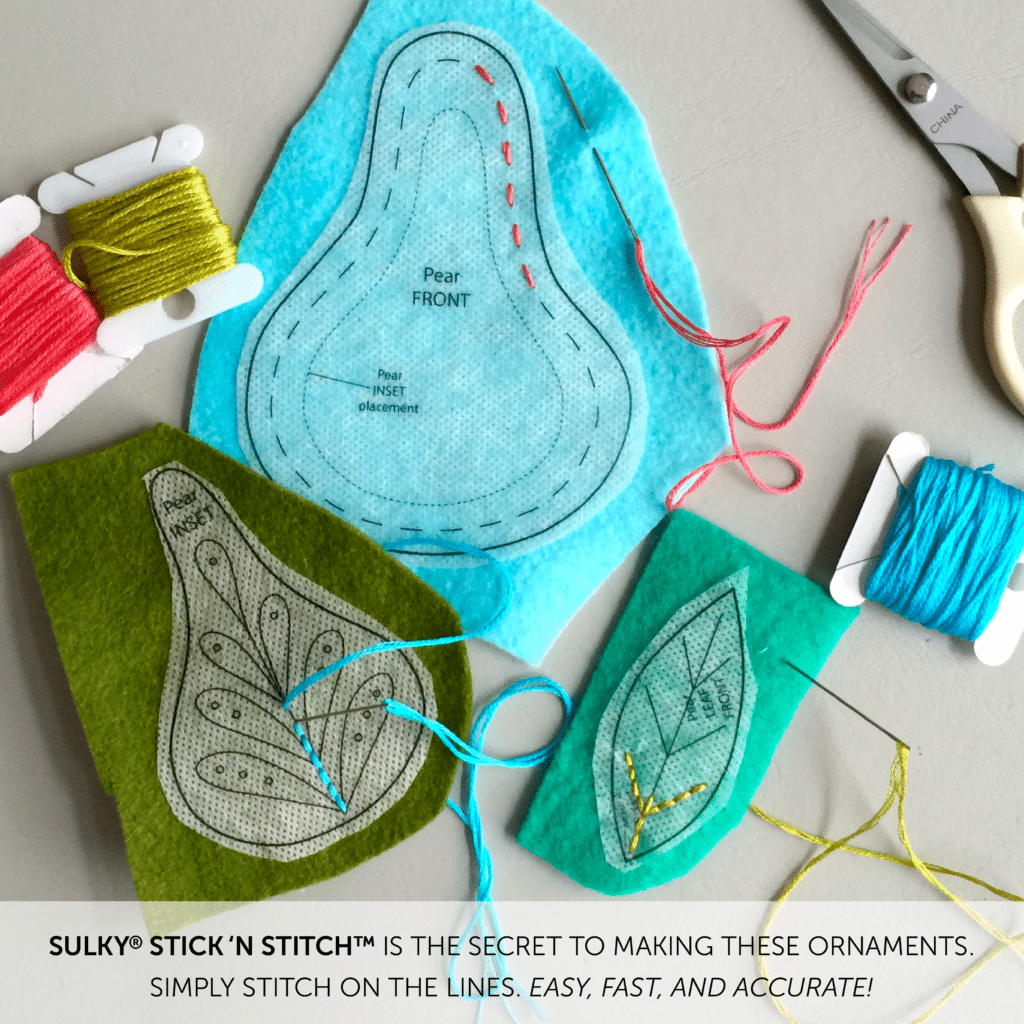
As shown above with my Partridge & Pear pattern, you simply print (or copy) the pattern to the Sulky stabilizer, peel off the backing, apply it to the pre-shrunk* wool felt and stitch right on the lines. It’s FANTASTIC. No pattern tracing or transferring embroidery designs. (Note: if possible, use a printer with toner as opposed to ink – some inkjet inks are water soluble and may stain your floss.)
When you are finished, simply cut out the piece around the outline and soak it in cold water** for 15-20 minutes. The stabilizer dissolves away! After the felt piece has air dried, you have a perfectly executed embroidery design. So good. You may notice the felt and stitching feels a little stiffer after it’s dry, like it’s been lightly starched. That’s perfectly normal. I actually prefer it because it helps secure your stitching and adds body and durability to the ornament.
And of course, Sulky Stick ‘n Stitch also works great for your regular fabric hoop embroidery projects. You can usually get it online at sulky.com, walmart.com, or amazon.com. And of course, try your local fabric or quilting store.
*Allow a day to pre-shrink your wool felt sheets before you make the project by simply soaking them with cold water, blotting them on a towel, and letting them air dry.
**The package says warm water for a smaller amount of time, but I prefer to use cool water for a slightly longer time to discourage shrinkage.
NOTE: If you have issues with the Sulky refusing to budge even though you are following the instructions, please read this.
2) THREAD MAGIC (formerly known as Thread Heaven)

Do you guys know about Thread Magic? I love this stuff. If you do a lot of embroidery or hand sewing you need to have this right next to you. Shown above with my really old box of Thread Heaven. Same stuff.
It adds a siliconey (technical term) coating to your needle and thread, which keeps knotting and snarling at bay as you sew. It makes the whole process of sewing French knots way less frustrating. If you coat your needle along with the thread it makes poking through the stabilizer as smooth as butter. Mm. Butter. But anyway, I love it and you can get it wherever sewing supplies are sold. It seems to last forever.
3) STUFFING FORK

Do you guys have a stuffing fork? You might need one. So much better than a dowel, crochet hook or that leadless pencil you’ve been using. It can’t be matched at stuffing tiny, hard to reach areas. Here’s a closeup of the business end:

You are perhaps saying, “So it has a tiny fork at the end, big whoop”. That’s because you don’t realize the fork is GENIUS. You take a loose pinch of stuffing, press it against the smoothly rounded fork and spin the fork like you are eating spaghetti. It makes a compact ball of stuffing that you slide into place in the tiny spot you are trying to stuff. The fork also makes positioning stuffing inside an ornament a cinch. It grabs and repositions the stuffing, whereas a dowel just pokes through it. I use my stuffing fork all the time with my ornament series. I also just bought the mini size for skinny legs.
Benzie Design has their own lovely branded stuffing tool. The fork and mini fork I have is from way back from Barbara Willis Designs. Warning, her website exists, but it is a dinosaur and may not be maintained. You can search to find them listed on Etsy and Ebay in dollmaking supplies.
4) DRITZ® FRAY CHECK

Dritz® Fray Check is listed as optional on my pattern supplies, but it’s really nice to have. It’s a clear, quick drying liquid that keeps things from raveling. Think of it like the hand sewing version of nail polish on your pantyhose.

Metallic embroidery threads tend to ravel and come untied, so just adding a dot of it to your hanging loop attachments and hanging loop knots ensures they won’t ravel with use. I love it for sealing the ends of cut ribbon also. You can see by the (somewhat alarming) label that it’s flammable when wet and you shouldn’t expose it to heat, so keep it away from your iron. It’s available at all your local sewing and crafting stores.
5) ALEENE’S ORIGINAL TACKY GLUE

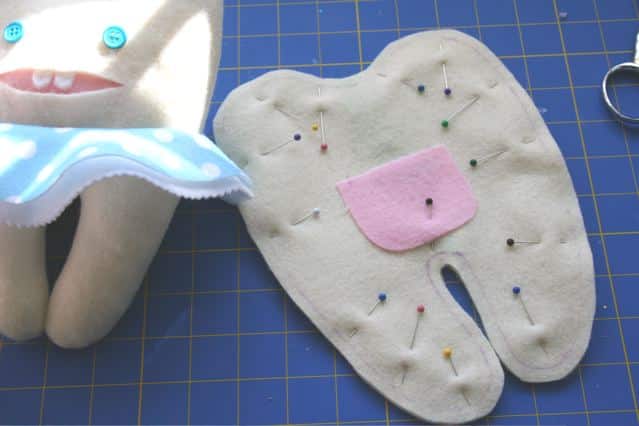
Whoever Aleene is, I’d like to hug her. I love this glue. It’s widely available in the US at any self-respecting local craft store or Wal-mart or Amazon.com. I use it on most of my ornaments where glue is needed and also to baste tiny pieces in place (which is more accurate than pinning).
Tacky Glue is nicely thick and dries to a clear finish pretty fast, but not so fast that you can’t reposition if needed. If used sparingly, I never have trouble sewing through it. If I get a smear of it on something, I can easily wipe it away with a damp cloth. I keep mine stored upside down in a cup at all times so that it stays ready to dot on when I need it. I also cut the hole in the nozzle as small as possible to control the flow of the glue. (Update: I just saw a newly packaged bottle that is designed to sit upside down on its own – thanks, Aleene!)

I never said it was a pretty cup.
LESS IS MORE. Just as important as having the right glue is knowing to use as little as possible to get the job done. In most cases when my patterns call for glue it’s just to tack something in place long enough for you to sew it down without using pins. For basting, just a hint of glue is usually sufficient, just tiny dots or smears.
In some instances, glue is used to hold something permanently in place, like wings. In those cases, you’ll want to use a little more glue, but it still doesn’t take a lot. You’ll know this if you ever accidentally glue two felt pieces together and then try to get them apart.

So do you find that you are glob challenged? Do you have problems with accidentally adding too much? Easy solution: squeeze a large glob of glue on a scrap piece of stabilizer backing. Then use a toothpick to apply the glue to the felt. Voila!
6) FABRI-TAC GLUE

Fabri-Tac is a clear, waterproof, fast drying permanent fabric glue. It’s kind of like having hot glue without the burns. It’s awesome and I don’t just use it for fabric. It’s also excellent for paper bonding. I spec this particular glue in some of my patterns. Aleene’s makes a quick drying waterproof glue also, but I’ve used both and Fabri-Tac seems to have a stronger more reliable bond.
7) COTTON PIPE CLEANERS and CHENILLE STEMS
My patterns use a lot of cotton pipe cleaners and also their cheaper, flimsier cousins, chenille stems.

Here’s a side by side comparison of the two. The creamy white one is a BJ Long’s cotton pipe cleaner and the gray one is a craft chenille stem from Joann.
COTTON PIPE CLEANERS: The cotton BJ Long on the left has soft, dense cotton fuzz that is about 3 mm wide. The wire is nicely hidden and the short fuzz makes it more slender. I use them for the interiors of my ornaments because they have a stronger wire and enable you to reposition/bend the arms and legs so the ornaments look more engaging and lifelike.
I also use them on the outside of the ornaments when the thinner look is needed, like for the French Hen’s feet and Maid’s pail handles. If you want a different color than off-white I have seen and purchased packs of colored cotton pipe cleaners, but you can also just dye the cotton pipe cleaner with a few strokes of a permanent fabric marker and let it dry. Another nice advantage of the cotton.
I buy my cotton pipe cleaners here, but you can find smaller packs in local cigar/vape/pipe shops and hardware stores too.
CHENILLE STEMS: Craft store chenille stems have polyester fuzz that is about 6 mm wide, and you can more easily see the wire in the middle. I specify chenille stems for the hair and some accessories on some of my ornaments. The wire inside the chenille stem is more flimsy compared to the cotton pipe cleaners. If you have a tough time finding the cotton pipe cleaners, you can try twisting together two chenille stems to substitute for interior bones. You may have to trim the fuzz to make it work in some places.
I buy my chenille stems anywhere there are craft supplies – they are not hard to find. Check the kid’s craft aisle. On some of my patterns I specify ‘mini’ chenille stems. They can be harder to find, especially since the pandemic. The width is 3 mm as opposed to 6 mm. Benzie Design stocks some if you can’t buy them locally, or you can just give a 6 mm chenille stem a nice haircut with a rotary cutter.
8) UNFINISHED WOOD BEADS

Some of my patterns use unfinished wood beads in a few sizes. If your craft store is a nice big one they might have them available right on the aisle. In my town, all the sizes are not usually available, so I order them from Etsy. There are several shops that carry them, and you can find them by doing a quick search for the size you need. The ones shown above came from here and here and they were great quality beads.
I like using hardwood beads that have a nice medium color, which is a good contrast if your ornament will have white hair. I find that light colored beads with no visible woodgrain can sometimes be too soft and more prone to bleeding when using gel or fabric pens.
9) WOOL FELT AND WOOL-BLEND FELT
It’s really important to get the right kind of felt for these ornaments. Both 100% wool felts and wool-blend felts work great. Wool-blend felts are a mixture of rayon and wool fibers and are less expensive than 100% wool felts. Most of my samples are made using wool-blend felts. 100% wool merino felts are so soft and dense, a true joy to work with. Both kinds of felt work wonderfully well!

I buy my felt online because my local craft store doesn’t carry it. I have a few vendors I like listed in my FAQ if you scroll down to the question about wool felt. I include links to vendors in the back of my patterns in the Resources section. Are you outside of the US? I have a list of international sources also.
COLOR GUIDES AND KITS: I have worked closely with two wonderful US felt vendors to provide samples and color guides to go along with the kits that they sell. You can see more about that here!

WHAT ABOUT POLYESTER CRAFT FELTS? For my heirloom projects just say no to the tempting sheets of synthetic/poly craft felts that you see in the kid craft section at the store.* They are plentiful and cheap, but they won’t work well for these ornaments. Besides having a limited color range and not being very durable or dense, there are other fatal drawbacks:
1) They don’t adhere well to the Sulky stabilizer or the Tacky Glue.
2) Small pieces fray and fall apart.
3) They are not dense enough to hold as small a seam allowance as is called for.
4) They melt if you iron them.
5) They can appear a bit shiny and can have an almost greasy feel (at least the kind that are made as patroleum products).
6) They develop an unattractive halo of fuzz and pills after being handled for a time.
*Except for where I specify poly or stiffened felts for some parts of some patterns.
So that’s it for the tools and tips. I hope this post has been helpful! The heirloom nature of these ornaments and the time it takes to sew them make it very worth purchasing the right tools and supplies. You’ll thank yourself!


This post is FANTASTIC. I just love all the extra detail you've gone to, I just wanna jump online now and order some of that stabiliser stuff. And I didn't know about stuffing forks either, and I love the comparison between the fake and real pipe cleaners. It's all in the details right? You've shown me new tips and I've been a crafter forever. Not only that but your ornaments are super cute. I'm pinning them right now!
Thank you for this post – I am planning on making a complete set of 12 days of Christmas – one for my lifelong friend and one for myself. So far I have made The Partridge and Pear (2), and the Colling Bird (2) and my two French hens are both 50% done – I had to find some perfect pipe cleaners, and now I have I am working on getting them finished for Christmas – this year! I love the tips on this page and I am going to get some of the silicony stuff and a stuffing fork because I do have difficulty in getting the stuffing where I want it. Your work is wonderful and I am so glad I found you. Oh! Nearly forgot to tell you that the Milkmaid is AWESOME!
Pauline
perry94022 at hotmail dot com
Hey, julesmadden, outstanding! I'm so glad it was a useful post. I was just going to share about Thread Heaven then I thought of a bunch of other stuff so it kind of snowballed. 🙂 Thanks a bunch!
Hey, Pauline,
Lovely! You'll love Thread Heaven and the stuffing fork! Thanks so much! 🙂
My sister and I are doing this series – she makes the evens, I do the odds – we each make two and then gift one to each other each Christmas.
Hi. I love your pattern but am really reluctant to do the printing myself. Are you ever going into selling the patterns already printed on the stabaliser?
Thanks Karen – karen.schulz@paradise.net.nz (as I am a no reply blogger)
That's a cool way to do it, Julie! 🙂 Have fun!
Hey, Schulz family! I will probably look into getting pre-printed ones at some point after the series is complete.
This is such a terrific resource! The only thing I would add is a fabric glue stick. I'm. . . um. . . liquid-glue-challenged and prefer to use the stick to hold pieces together for hand sewing. 🙂
Hey, Wendi! Oh yes, I love a good fabric glue stick. I use those for appliqué (thanks to you) and love them! However on these ornaments the pieces are small and a stick might be too large to work with in some instances?
Nice blog and so informative thank you for sharing us.
I couldn't find your email address anywhere to email this instead – but you should sign up as an amazon affiliate if it's available in your state! Maybe you're like DUH I know, everyone knows. But. Just in case 🙂 I am so intrigued by that stuffing fork, I want one!
I have had problems with some printer ink bleeding (when soaking after completing embroidery) and permanently staining the embroidery floss when using the sulky stabilizer 🙁
Hey, Kathleen,
I use a laser printer and haven't experienced that. If you are using an inkjet printer the ink may be water soluble? I'd try a laser printer or copier.
I will try that, Larissa. Thank you
Has anyone else had problems with their inkjet printer ink bleeding after soaking the Sulky? Haven't started my ornaments yet, but concerned about this. Thanks!
Hi, Kitty, the commenter just above you was having issues with that. I guess it depends on your inkjet ink. Some is water soluble so in that case it might bleed. I use a laser printer and/or copier and those work well. You may have to try a test piece to see abou the ink. HTH!
Yes, I saw the above comment and that's why I was concerned. I'll try a test piece first and if it bleeds, I'll see if I can get the patterns printed on a laser. Thanks Larissa!
I just saw your ornaments on a blog and had to go a take a look myself. Love them. I'm really into wool felt embroidery/applique at the moment. I've made a few Wendy Williams quilts (from Australia). I have heaps of offcuts. Perfect for your ornaments. I loved seeing your hints and tips. I've found someone in Australia who stocks the stuffing fork! Have you tried Roxannes Glue Baste-it? Highly recommend because of the fine tip. I'm off to buy some of your patterns.
Hey, Helen! Thank you! Yay about the stuffing fork. I love mine! I have not tried the glue baste-it. I'll look into that. 🙂
Larissa: Have you ever tried "Stick 'n Stitch" by Sulky? I don't know if this is a new product, but it sounds like it might work with your ornaments . . . when you run out of Sticky Fabri-Solvy. I'm almost finished with the black swan and am loving the process. Now I have to order the other 7 and get working on them. No rush, but I'm really looking forward to seeing the last four!
Judy S., yes, thanks! It's actually the exact same product, just rebranded with a more accessible name! Haha. I need to do a post about that! I have a big stack of it on my desk right now. Happy sewing! Number nine is underway and the others will follow this year.
does anyone have issues peeling the Sulky off the felt? I'm not talking about soaking it after it's stitched, I'm talking about just peeling it off the small pieces that aren't embroidered. Seems to be so sticky and I'm afraid of distorting the pattern by pulling so hard. I LOVE these patterns and the use of colors everyone seems to be using on Instagram, I just thought maybe I was doing something wrong with the Sulky sticking so much.
Hi, Linda, I'm so sorry to be late in replying. I missed this somehow. Hmm, I do not have an issue with this. It's true I find the stabilizer tends to stick better to 100% wool felt as opposed to blends, but I've never had trouble getting it off of unembroidered pieces. I have heard from Wendi Gratz that if her stablizer was exposed to too much heat it got gummy and tackier. Is this maybe the case with yours? Also high humidity might be a problem as well, since it's water soluble. I noticed once when my fingers were damp it created a problem also. If it continues to be an issue may I suggest contacting Sulky America? Their customer service is fantastic and they stand by their products.
These are sooo lovely!! I just bit the bullet and bought the wool from one of your suppliers. I've got the other items you recommended on their way as well. I'm very tempted to buy the 1-6 bundled patterns but if you're close to just having all of them in one batch I might hold off. I bet this is your most-hated question: how long do you think I'll need to wait? Did I tell you how much I super love these patterns?:)
Hello! Thank you. Haha! No worries! I'm confident it will be released by the end of January, so you don't have a long time to wait! It might be before but I can't commit to a certain day because as soon as I do, life happens. I'll shout about it on all my channels when it releases, believe me. 🙂
<3 <3 <3
Thank you for all your tips about the felt ornaments. I just wish there is a metal die cut that will cut out all pieces then we can just sew on it easy! 😛
Hey, Petti! Here’s the thing: I’m not sure a die cut would work well. After embroidering, the pieces tend to pull in and warp a bit, so die cutting after embroidery would not work well. Die cutting before embroidery would make the pieces hard to hold and some of them impossible to hold. So cutting them by hand is just the best option! A tiny pair of sharp scissors is essential to do that easily. Happy stitching!
Great tips here, thanks. I've just started making these, and wondered why the hanging loops aren't attached while sewing the pieces together, so that the knots and ends are hidden inside each ornament. Are they added afterwards so that they hang better? Thanks
Hello, Jo!
Yes, that’s exactly it. The loop is best added after so that you can check how the ornament hangs first. The raw ends are still hidden inside the ornament if you follow my method of adding the loop in the pattern. Great question!
Hi
I have done all the embroidery now for all 12 in the series. The patterns are fantastic so easy to use and anybody could have a go at making these lovely ornamets. I am making them for my daughter, we do an advent house which is like a calender but more work and extra cost !!!!
It started as being just sweets and goodies but ha grown and grown. The house is felt and houses 24 gift for her to open. Christmas 019 is going to be special with these felt pieces. Our plan is to give her a pot grown tree with these 12 days of Christmas to hang on and the alternate days another small gift.
The only part I am struggling with is the faces so going to leave these to last as this could make or break the look. Just a word of caution try the wood first with the pens you are going to use as mine bled into the wood and have wasted two beads already.
This is quite an expensive project but the enjoyment making and giving will be worth it.
Great comments! I'm so glad you are enjoying the makes, and what a cool gift idea for your daughter! 🙂
Hi Larissa! I am looking all over for your needle recommendations. I could swear that I read them somewhere, but I can't find them. Please help!
Hi, Jill! I use a size 5 embroidery needle for most of the embroidery on my patterns. I think you might be looking for this post? https://mmmcrafts.blogspot.com/2018/06/hey-larissa-what-do-you-mean-by-4.html
Thank you! That's the post I was looking for!
Hi, Larissa and other makers! I've finished the birds and am working up courage for the people in the set. I saw online (ages ago) someone had made people of color by staining the beads. I'd like to do this, but I've never used wood stain before. Anyone have any tips? And would you put the stain on before or after the pen strokes? Thank you!
Hey, CM Mom, I have not tried my hand with staining the beads, but I don't believe it would be super difficult. I'd just read the instructions that come with your stain and be sure to let the stained beads cure completely before you attempt to do faces or use glue. If it's not totally cured and dry, the glue and ink may not adhere correctly. Alternatively, you could paint w acrylic instead of staining. That should also work well, but you would not be able to see the natural grain of the wood. I hope that helps! 🙂
Great tips – I've purchased a cute Santa awhile ago, but not confident to begin. These tips help. Thank you sooo much and I'm excited to begin!
I wouldn't be afraid to print your own….I have done 4 complete sets of the 12 days of Christmas and have not had any print errors. They print up so wonderfully on the stabilizer.
I'm going to get myself a stuffing fork?
I too have noticed that theSulky sticks too much to the wool blends, and does much better with the 100%wool. To counter that, I take the cut sulky pieces and put them on my jeans a couple of times, to wear down the stickiness, before placing it on the wool blends. If I don’t do that, my wool blend fibers tend to pull up with the Sulky when I remove it from non embroidered pieces. I’ve thought about soaking all pieces in cool water to remove the Sulky too, which would be another way to deal with this problem.
whiterose, that is a clever workaround! Thanks for adding it!
I use an inkjet. Once I had a bad cartridge that bled a little, I go the stains out of the felt by a adding a little OXY in the soaking water. And then have it a rince. Came out perfect
Is there a way to tell if felt is a wool blend, 100% wool, or just cheap felt? I have some felt gifted to me and wonder how to tell if it will work?
Hey there! I can usually tell by the heft and hand if it is wool or cheap craft felt. Acrylic or poly felt is very lightweight and has more of a slick feel if you rub it between your fingers. It also tends to look a little shiny under light. Wool and wool blend are more densely felted, look matte, and will wrinkle more readily if you ball them up. If you still aren’t sure, cut off a scrap and find a match or lighter to use in a safe way. If it melts it’s likely acrylic or poly, if it smolders it’s likely wool.
Hi, Larissa! Thank you for this lovely set of ornaments! I have been working on my first set for several years. I like to stitch in the evening while relaxing and watching/listening to TV. I have had cats forever and realized that stitching whilst relaxing was almost impossible with a nosey cat on my lap LOL! Well, my cat finally went to heaven a year ago, he was 20 years old.
I am now able to get my ornaments done. I am finally putting Lords a Leaping together, which brings me to the question… Why are the last four ornaments in a different order as the typical 12 Days of Christmas? I recall reading something about this years ago, but I can’t remember what you said.
Also, I turned my sister on to these ornaments, she loves them.
I will be finishing, T’was The Night Before Christmas next. I have finished Mrs. Clause.
Sorry, this is so long, I appreciate this article on the tools. I am about to order the Thread Magic/Heaven! Yea!
Hey Charlette, I’m so sorry to hear of the passing of your cat. 20 years old! Congratulations on your soon-to-be completed set of ornaments! My series is based on the original English carol, not the modern song. You can read more here:
https://mmmcrafts.com/twelve-days-ornament-series/